There is nothing more to say about the term screen recording. It is the process of capturing everything that is displayed on a screen. Screen recording tools allow you to record both video and audio simultaneously. There are some utilities which provide editing of recorded video with some basic tools. There are working screen recorded packages available for almost all Operating Systems. In case of Windows, Mac, and Linux, there are professional and dedicated screencasting software packages available.
Once you migrate to Chrome OS, you may think whether screen recording is possible or not. This is because Chromium OS is relatively small and won’t support packages like Windows or Mac. But nothing to worry. You can easily record screen in Chromebook with the help of Google Chrome browser.
Steps to do screen recording in Chromebook or Google Chrome OS without 3rd party apps
Step 1:- Open your Google Chrome Browser.
Step 2:- Navigate to Chrome Store. Search for Nimbus Screenshot & Screen Video Recorder. You can use the following link to download the extension directly.
Step 3:- Once you add the extension to chrome browser, you can see the icon on the extension list. Also, on the top left corner of Google Chrome, the icon similar to “N” gives direct access.
Step 4:- Click on the extension icon and you will see a lot of op options. Generally various screen capture formats. But look at the bottom and you will see the option to record video.

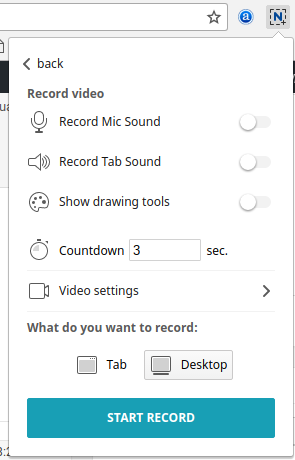
Step 5:- Click on Record Video. There are several options available on the next step. Just keep reading till the bottom to get more details about these options.
Step 6:- After finalizing your settings, click on the “Start Record” button to start screen recording.

There you can see two options for recording. Entire screen recording and Application Window Recording. You can choose any of them based on your requirement. If you are preparing an entire desktop video, you should choose Entire screen recording option. It will record everything on your desktop. No matter whatever thing you do on your screen. It will be in your storage space, once you stopped the recording.
If application Window recording is what you chose, only the specific or targeted application got recorded. Suppose, If you choose Chrome Browser from the list, only things displayed in Google Chrome gets recorded. Whenever you come out from Google chrome and open other application say “video player”, it won’t get recorded. Entire screen recording or Application Window Recording, it completely depends on your choice.
Recording Options in Nimbus Screen Recorder explained
Once you are at Step 5, there are many options available for screen recording.
Record screen with Mic:- This is a great option for recording sound in real-time. If you need just the video only, no need to care about this feature. Very useful for those who are making live tutorials with voice. This feature is in turned off stage by default and you need to enable it for using it.
Record Tab Sound:- This is the option to record video along with the system sounds. For example, if you enabled sound for the mouse click, checking this option will provide Mouse click sound in the output video. Also if you play a video during recording, the audio will also available if you enable this option. Note that, Mic sound and Tab sound are totally different.
Show Drawing Tools:- These are quick edit tools. Some useful and drawing tools were added to Nimbus Capture on the latest version and you can use it while recording. In this option, you can see some modified cursors, pencils, arrows etc. Once you do marking with pencils and arrows, it is quite easy to remove it. You can hide the drawing toolbar using the extension or by using the shortcut key Alt + V. Many people complaining that drawing tool is not available. Even they choose the option, it won’t appear while recording. It is because, they are in developing stage and surely compatible with next update.
Countdown Timer:- This feature helps you to pre-determine the delay timing for screen recording. If you provide 10 Seconds, the recording will start only after 10 seconds. It gives enough time for preparing your recording.
Video Settings:- You can choose the video and audio quality for screen recording. Nimbus supports screen recording up to 4K quality. There are many other low-quality options too. Audio Bit-rate and Video bit-rate are other options. It depends on what quality you need the output. There is another option to Auto delete drawings. You can provide the time delay for auto-deleting the arrows, texts and whatever stuff you create using Drawing tools.
Conclusion
Screen capturing and screen recording are one of the basic features that every OS required. In case of screen capturing, there will be a default tool for almost all OS. In case of windows, there is snipping tool, for Android, there are many Hot Keys and for Chrome OS snipping tool feature can be achieved using Shortcut keys. But for Screen recording, you need some plugins or 3rd party software to be installed. In Chrome OS, no apps are required to record your screen. Just a chrome extension which can do whatever you want.
As Nimbus is a Chrome extension, many people think that it can only record inside chrome. But using the screen sharing feature chrome performs recording outside the browser. if you have any doubts regarding screen recording in Chromebook, please comment it below.
Hi, Jinson. Very informative! Thanks for showing clearly how to record screen on Chromebook. I’d also recommend Acethinker Screen Recorder which I have been using for many years. It is an online tool that lets you record your screen right from the browser. You don’t have to install any additional plug-ins or add-ons. Share it here as an alternative solution.